
This is a common question I receive from people saying they want to glue their new mirror to a wall and have seen it done on TV where the installer uses silicone to glue it up. The only problem is, there is the potential for the silicone to damage the back of the mirror. Will silicone damage a mirror back?
Silicone will only damage a mirror if it releases acidic chemicals, or has other corrosive residues. Acidic cure silicone must be avoided. Neutral cure silicone is ideal for gluing mirrors up.
Over the last 20 years, I have glued many mirrors to walls with silicone. I wrote this article to help share the knowledge I have learned during this time so that you can do it right the first time.

In this article, you’ll learn everything you need to know to glue a mirror to a wall or any other surface using mirror-safe adhesives. You’ll discover the best adhesives to use for such a project and why silicone isn’t ideal for this. More importantly, you will find out how to install a mirror using adhesives step-by-step alongside the best practices that help ensure the installation has longevity.
Table of Contents
- 1 Can You Use Silicone on the Back of a Mirror?
- 2 What Is the Best Adhesive for Mirrors?
- 3 What Removes Silicone From a Mirror?
- 4 What Is the Best Silicone for Mirrors?
- 5 How to Glue a Mirror on the Wall
- 5.1 Mark the Wall
- 5.2 Get spacers and double-sided tape
- 5.3 Apply Double-sided Tape
- 5.4 Stand your spacer sticks on the bench
- 5.5 Apply Mirror Adhesive to the Back of the Mirror
- 5.6 Stick the Mirror to the Wall at the Marked Spot
- 5.7 Take Off Your External Holds and Clean the Mirror
- 5.8 Best Practices for Better Hold
- 6 Final Thoughts – Will Silicone Damage A Mirror Back?
- 7 Hot Glass vs Cold Glass – What’s The Difference?
- 8 Can Quartz Be Made Into Glass? Guide On Quartz & Glass
- 9 What Is Panda Glass | Ultimate Guide To Panda Glass
Can You Use Silicone on the Back of a Mirror?
In general, only neutral cure silicone should be used on the back of a mirror as the normal acidic cure silicone will eat away at the mirror backing.
The problem with using silicone on the back of a mirror isn’t with silicone itself but its curing process. Since most accessible silicone adhesives are acidic cure ones, using them to bond a mirror or to stick to certain surfaces isn’t the best idea.
You can’t silicone the back of a mirror if the silicone takes too long to cure or is acetic cure variety. That’s because, as such silicone cures, it releases chemicals that erode the opaque backing of a mirror and can render the mirror translucent and ineffective.
Enough about silicone. Have you ever wondered do mirrors make you look shorter? I explain this in my article.
You may have noticed that this isn’t as much about silicone as it is about its curing process. And since not all silicone cures alike, not all silicone is bad for mirrors. When looking for the right kind of silicone for your mirror, you must prioritize quick curing and neutral silicone as these don’t release acidic residue onto your mirror’s back.
In case you find neutral cure silicone, you can use it on the back of a mirror, given that the mirror isn’t too heavy. Remember, a quicker cure means a weaker hold in this context.
Always use Neutral cure instead
of Acidic cure silicone
So, while quick-curing silicone exposes your mirror to fewer chemicals, it also binds it only mildly. If your mirror is too heavy, then this isn’t the solution to insist on. Instead, you should look outside standard silicone or caulking and look for mirror adhesives.
Hot glue can be used to glue glass together. Have you tried it? Read more.
Using mirror adhesives is self-evidently less risky as you’re not risking erosion of your mirror’s back. More importantly, the adhesive can be applied in thicker layers, and higher quantities which buys you the peace of mind that it will not fall after the mirror is stuck to the wall.
Silicone is only one adhesive, and if one’s looking for alternatives to use with a mirror, the best place to look is the construction adhesives section of a home improvement store.

But before you head to the local home depot seeking a silicone-free adhesive, remember that acidic chemicals are the problem and not silicone. When seeking alternatives, make sure they check the following boxes:
- The adhesive should not be solvent-based
- The adhesive should not have acidic residue upon curing or drying.
What Is the Best Adhesive for Mirrors?
Let’s be honest; you’re not here to take homework to Home Depot. You’re here to find the best way to stick the mirror in your home to your wall. So, if the silicone supply you have at home smells like vinegar, then it should be kept far away from the mirror.
And if you don’t have time to check for acidic residue or curing times of different construction adhesives, pick one of the mirror adhesives listed below, starting with the best.
The best mirror adhesive is Liquid Nails LN-930, which takes only 10 minutes to cure, leaving little room for the mirror back to be damaged. It also has strong adhesion that withstands the heat from environments like hot bathrooms and kitchens.
It is among the few adhesives guaranteed not to damage the back of your mirror. With most other glues, the manufacturers shy away from putting the claim in writing. And while using any adhesive with a mirror is risky, knowing that the product you’re using is guaranteed by the manufacturer not to damage your mirror is helpful.
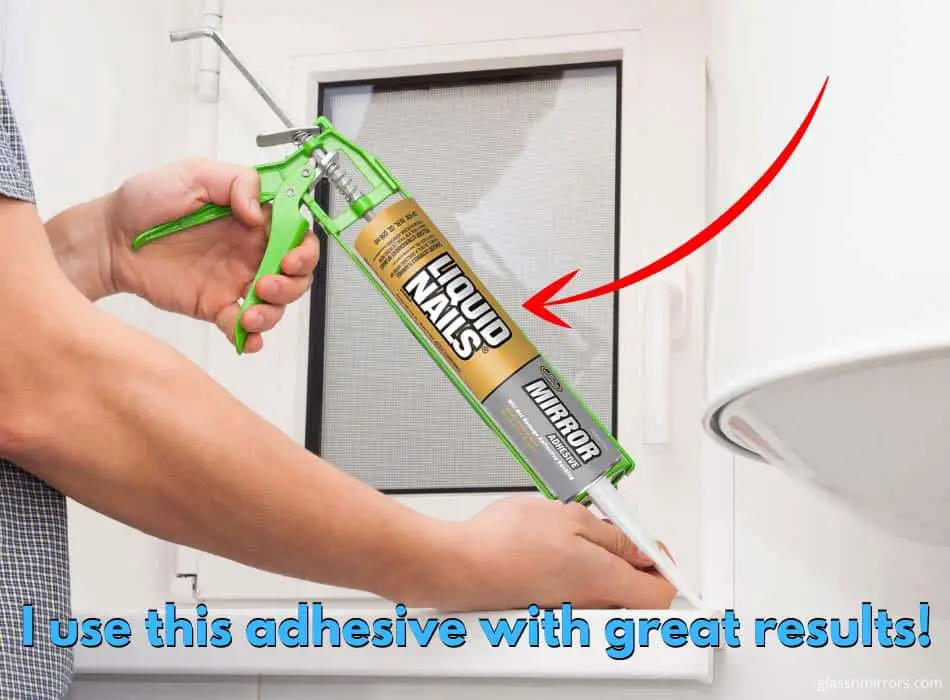
I buy my Liquid Nails LN-930 here on Amazon.
My second choice is Loctite PL520 Mirror

As a general rule of thumb, if your mirror adhesive is manufactured by an established business with over five years in the market and the product’s name includes “mirror,” it is safe to use with a mirror. The rationale is that the money a business makes selling glue isn’t worth the reputation damage that comes with selling mislabeled products.
Loctite is a well-established brand backed by Henkel Adhesives. And as if that wasn’t enough, the actual product has a 4.1 out of 5 stars average rating on Amazon. Remember, the curing time is pretty quick, and if you try to lay it in a tub to scoop and apply as you take your sweet time, you might have a cured lump of putty. Apply directly and move swiftly before it cures.
My third choice is Gorilla Glue Heavy Duty Construction Adhesive

Gorilla Glue is yet another well-respected brand that has been around long enough not to be taken lightly. So, when the manufacturer says it “Bonds virtually everything,” you can be sure that it can bond a mirror. The only question left, then, is how long it takes to fix two surfaces.
Remember, the longer working time an adhesive has, the more your mirror is at risk of having a scratched back and unusable spots. Fortunately, this Gorilla Glue product sticks in 30 seconds, which might be a drawback for some people.
But from the mirror preservation point, this is excellent. With over 4,000 reviews and ratings, its global collective average stands at 4.5 out of 5 stars, where adhesion has a specific rating of 4.1 stars. However, not all of the product’s customers used it for their mirrors.
The above options are pretty good at not affecting the back of your mirror. But you may recall that a quicker cure can also translate to a weaker hold. So how does one offset using one of the above mirror adhesives given that they are quick to dry?
The solution is in quantity applied. You should use more glue so that each wad of adhesive has less pressure to bond. Using more glue doesn’t mean laying it thick. It means applying more wads of adhesive across a broader surface. This is discussed further in a later section.
But if you don’t want to read further, just remember to test an amount of glue with something that weighs as much as your mirror. If the object you’re testing doesn’t fall down when held by the adhesive you’re testing, the chances of your mirror shattering are relatively low.
What Removes Silicone From a Mirror?
At this point, you’re in one of two situations. You’re either relieved that you did not use silicone to glue your mirror to a wall, or you’re frantically trying to get rid of the silicone you may have pasted on your mirror’s back. If you’re in the latter camp, you must know the following.
You can remove silicone from a mirror using the appropriate solvent for the type of adhesive that was used. Care should be taken while doing this so as not to scratch the mirror backing which can remove the mirror film and ruin the mirror.
If it is cured in a brittle manner, you can get rid of it by simply rubbing it until it comes off. Either way, the sooner you get rid of any silicone that’s on your mirror, the better chances you have of saving your mirror’s back.
But the above urgency applies only to silicone that releases acidic chemicals. Remember, you can use neutral cure silicone without any problems.
What Is the Best Silicone for Mirrors?
The worst kind of silicone is usually the type lying around at home, which is why I recommend you carefully read the label first. And if you’re going to buy a new adhesive for your mirror, you might as well buy a non-silicone mirror adhesive. But this dichotomy leaves one question unanswered: what type of silicone is ideal for mirrors?
Neutral cure silicone is the best for sticking mirrors to the wall. With neutral cure silicone, the liquid released upon curing is usually alcohol which doesn’t damage the mirror back as much as the acidic release of a regular silicone tube.
To differentiate the two, simply smell what comes out of the silicone applicator. If the smell is unbearably vinegar-like, then the silicone in question is acidic and will corrode your mirror’s back (And even the front coat).
If the silicone tube smells neutral or has a slight alcoholic odor, then it is relatively safer for the mirror. Here, “relatively” is the keyword as the mirror is only as safe as the thickness of its backing and the “kindness” of the silicone caulking.
Most tubes have either “Acidic” or “Neutral” written on them like in the below photo.
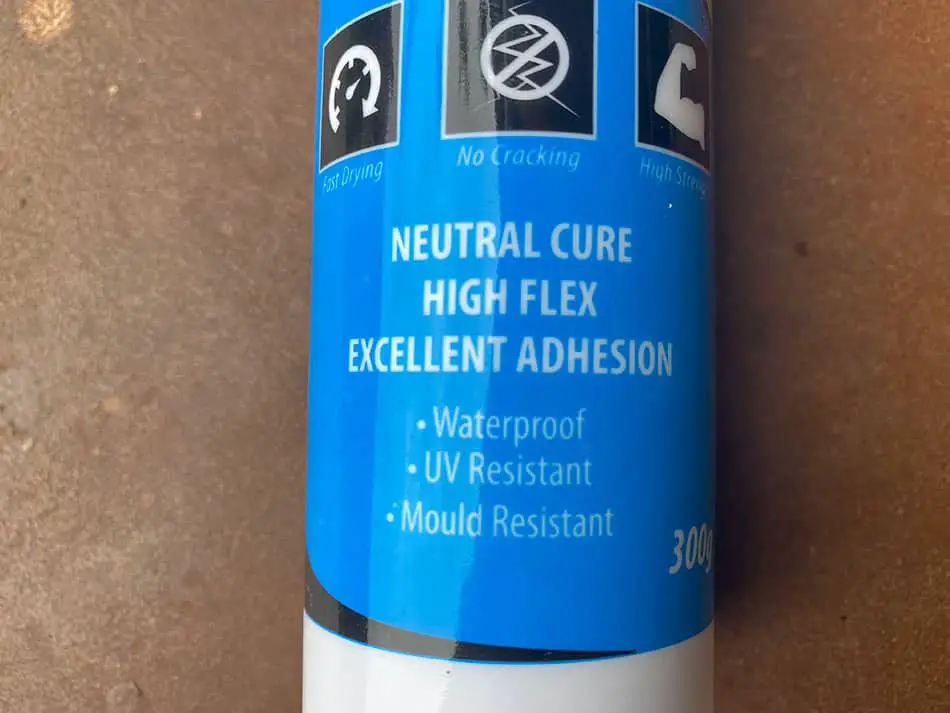
If you can’t see Neutral or Acidic cure on
the label, always assume it is acidic cure!
How to Glue a Mirror on the Wall
To glue a mirror on the wall, first, choose which type of adhesive you plan to use and apply it to the mirror’s back in enough quantity across the surface and fix it to the wall.
Now, let’s break these steps down in detail and incorporate best practices along the way.
Mark the Wall
The first step is to use a measuring tape to measure the mirror and know its dimensions. This helps you figure out how much adhesive you’ll need and also what area of the wall to delegate for the mirror.
The last thing you want is for your mirror to be bigger than the wall space designated for it or vice versa. Use a measuring tape as a guide and with a marker highlight on the wall where each corner of the mirror will be placed.
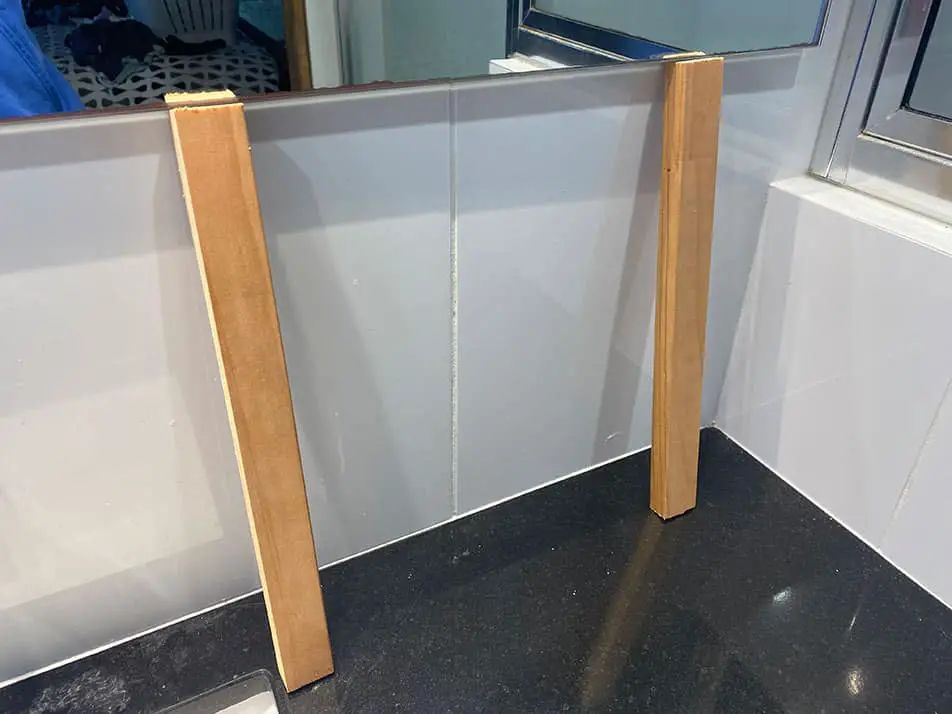
Get spacers and double-sided tape
These items will give you a professional job and make your life so much easier later on. I always recommend you get yourself some pieces of wood the correct length as to how far above a bench you want the mirror to sit. See the below photo.
Double-sided tape is used on the back of the mirror and helps hold it in place until the adhesive dries.
Apply Double-sided Tape
Cut a few squares of double-sided tape and apply them to the back of the mirror. The 4 corners are generally enough for an average size mirror. Remove the backing of the double-sided tape to expose the sticky area.
Stand your spacer sticks on the bench
Place those 2 sticks of wood I mentioned earlier onto the bench or floor where the mirror will go. This will form a platform to rest your mirror on giving you a nice level mirror.
Apply Mirror Adhesive to the Back of the Mirror
Best to follow the manufacturer’s guidelines of the adhesive you are using but as a general rule, I usually apply several lines down the back. Apply it liberally in case your wall is not straight or even. Give this Liquid Nails especially for mirrors a go. I find it works well.
Stick the Mirror to the Wall at the Marked Spot
This is pretty much the final step for lighter mirrors. You simply rest your mirror onto your spacer sticks and lightly press the corners where your double-sided tape is against the wall. Also, go ahead and lightly press all areas of the mirror to ensure the adhesive is touching the wall.
The double-sided tape will now hold your mirror while the adhesive sets. This will depend on what type of glue you use.
Take Off Your External Holds and Clean the Mirror
Whether you’re taking your hands off after ten minutes or removing the tape after 24 hours, you’ll eventually need to get rid of all holds except the glue. Clean the mirror at this point, as it will likely have fingerprints and tape marks. Once done, the mirror is secure on the wall.
Best Practices for Better Hold
To attach a mirror to the wall with glue, you can follow the steps above. However, some mirrors are too thick for any amount of construction glue and require additional support. The following ideas are what I would use for larger mirrors:
- Use a wooden or aluminum frame – The mirror gets glued into the frame and then you can use screws to fix the mirror into the wall studs.
- Use wooden rails behind – In the past I have glued 2 wooden rails to the back of the mirror and then screwed 2 matching rails to the wall. Each of these rails has a 45-degree miter on one long edge. This forms a French cleat-style system. The long wooden rails provide a greater gluing surface for the glue to bind.
- Have the mirror sit on the vanity benchtop – If you install the mirror in your bathroom, have it stand on the vanity benchtop.
Final Thoughts – Will Silicone Damage A Mirror Back?
Using silicone to bond a mirror is great as long as you have natural cure silicone. And if you want to buy neutral cure silicone specifically for a mirror project, you’re better off buying a mirror adhesive, which is more specialized in bonding mirrors and preserving mirror backs. If you find an adhesive to be weak for your particular mirror, use other methods to add support instead of opting for corrosive glue.
-
Hot Glass vs Cold Glass – What’s The Difference?

When most people think of glass, they probably think of windows or drinking glasses. But there is a lot more to glass than that. In fact, there are two main … Keep Reading
-
Can Quartz Be Made Into Glass? Guide On Quartz & Glass
Glass making is a process that involves heating and cooling sand and other minerals. You may wonder whether it is possible to make glass out of quartz. Glass is made … Keep Reading
-
What Is Panda Glass | Ultimate Guide To Panda Glass
When looking for a new phone case, you may have encountered the term “panda glass.” A variety of phone cases on the market use this type of glass. But what … Keep Reading